1. I wish Google Maps had an “Avoid Ghetto” routing option.
2. Nothing sucks more than that moment during an argument when you realize you’re wrong.
3. More often than not, when someone is telling me a story all I can think about is that I can’t wait for them to finish so that I can tell my own story that’s not only better, but also more directly involves me.
4. Have you ever been walking down the street and realized that you’re going in the complete opposite direction of where you are supposed to be going? But instead of just turning a 180 and walking back in the direction from which you came, you have to first do something like check your watch or phone or make a grand arm gesture and mutter to yourself to ensure that no one in the surrounding area thinks you’re crazy by randomly switching directions on the sidewalk.
5. Sometimes I’ll look down at my watch 3 consecutive times and still not know what time it is.
6. Sometimes, I’ll watch a movie that I watched when I was younger and suddenly realize I had no idea what the f was going on when I first saw it.
7. I would rather try to carry 10 plastic grocery bags in each hand than take 2 trips to bring my groceries in.
8. The only time I look forward to a red light is when I’m trying to finish a text.
9. LOL has gone from meaning, “laugh out loud” to “I have nothing else to say”.
10. How many times is it appropriate to say “What?” before you just nod and smile because you still didn’t hear what they said?
11. While driving yesterday I saw a banana peel in the road and instinctively swerved to avoid it…thanks Mario Kart.
12. Shirts get dirty. Underwear gets dirty. Pants? Pants never get dirty, and you can wear them forever.
13. I can’t remember the last time I wasn’t at least kind of tired.
14. Why is it that during an icebreaker, when the whole room has to go around and say their name and where they are from, I get so incredibly nervous? Like I know my name, I know where I’m from, this shouldn’t be a problem….
15. You never know when it will strike, but there comes a moment at work when you’ve made up your mind that you just aren’t doing anything productive for the rest of the day.
16. I’m always slightly terrified when I exit out of Word and it asks me if I want to save any changes to my ten page research paper that I swear I did not make any changes to.
17. I hate when I just miss a call by the last ring (Hello? Hello? Dammit!), but when I immediately call back, it rings nine times and goes to voicemail. What’d you do after I didn’t answer? Drop the phone and run away?
18. I like all of the music in my iTunes, except when it’s on shuffle, then I like about one in every fifteen songs in my iTunes.
19. Why is a school zone 20 mph? That seems like the optimal cruising speed for pedophiles…
20. I keep some people’s phone numbers in my phone just so I know not to answer when they call.
21. Even under ideal conditions people have trouble locating their car keys in a pocket, , and Pinning the Tail on the Donkey - but I’d bet everyone can find and push the Snooze button from 3 feet away, in about 1.7 seconds, eyes closed, first time every time…
22. It really pisses me off when I want to read a story on CNN.com and the link takes me to a video instead of text.
23. I wonder if cops ever get pissed off at the fact that everyone they drive behind obeys the speed limit.
24. I think the freezer deserves a light as well.
25. I disagree with Kay Jewelers. I would bet on any given Friday or Saturday night more kisses begin with Miller Lites than Kay.
Original Post : Reddit
Friday, September 18, 2009
Wednesday, December 3, 2008
Programmatically customize site navigation in WSS 3.0 and MOSS 2007 - By Todd Baginski
I am summarizing one beautiful article from Todd about Adding/Updating/Deleting Navigation Items in sharepoint.
Here is an example of how to set a sub site not to use the navigation from a parent’s site.
SPSite noSharedNavSite = new SPSite(“http://server/test/nosharednav”);
SPWeb noSharedNavWeb = noSharedNavSite.OpenWeb();
noSharedNavWeb.Navigation.UseShared = false;
QuickLaunch Menu Items
Here is how you add a menu item to the QuickLaunch navigation menu.
These QuickLaunch examples assume you have created a top level site named quicklaunch.
Once this top level site has been created its URL will look like this: http://server/quicklaunch
In this example we will add two links to the QuickLaunch menu for the quicklaunch
top level site, one link will be internal and one will be external. The internal
link will point to the Links list in the QuickLaunch site. The external
link will point to the SharePoint Experts web site.
SPSite quickLaunchSite = new SPSite(“http://server/quicklaunch”);
SPWeb quickLaunchWeb = quickLaunchSite.OpenWeb();
SPNavigationNodeCollection quickLaunchNodes = quickLaunchWeb.Navigation.QuickLaunch;
SPNavigationNode internalMenuItem = new SPNavigationNode(“Links”, “Lists/Links/AllItems.aspx”, false);
quickLaunchNodes.AddAsFirst(internalMenuItem);
SPNavigationNode externalMenuItem = new SPNavigationNode(“SharePoint Experts”,
“http://www.SharePointExperts.com”, true);
quickLaunchNodes.AddAsFirst(externalMenuItem);
quickLaunchWeb.Update();
*Note: If you do not call the Update() method on the SPWeb object you are working
with, you will need to reset IIS to see your changes.
Here is what the quicklaunch Site Collection looks like after the above code has
been executed:

Here is how you remove a menu item from the QuickLaunch navigation menu.
In this example we will remove the external link to the SharePoint Experts web site.
SPSite quickLaunchSite = new SPSite(“http://server/quicklaunch”);
SPWeb quickLaunchWeb = quickLaunchSite.OpenWeb();
SPNavigationNodeCollection quickLaunchNodes = quickLaunchWeb.Navigation.QuickLaunch;
quickLaunchNodes.Delete(quickLaunchNodes([0]));
quickLaunchWeb.Update();
Here is what the quicklaunch Site Collection looks like after the above code has
been executed:

Taking the QuickLaunch menu one step further
The QuickLaunch menu is capable of displaying links in a grouped fashion, as you see
in the screenshot above. For example, the Lists menu item in the screenshot
above has two items under it – the Calendar and Tasks links. Creating your own
grouped links can be done programmatically. This is once again a simple process
that requires very little code.
Here is how you add grouped menu items to the QuickLaunch navigation menu.
In this example create a header link for the group of links and name it
Administration. Then we will add two links under the Administration header link.
The links will link to the Create and Site Settings pages for the
quicklaunch Site Collection.
SPSite quickLaunchSite = new SPSite("http://" + serverTextBox.Text + "/quicklaunch");
SPWeb quickLaunchWeb = quickLaunchSite.OpenWeb();
SPNavigationNodeCollection quickLaunchNodes = quickLaunchWeb.Navigation.QuickLaunch;
SPNavigationNode internalMenuItem = new SPNavigationNode("Administration", "", false);
quickLaunchNodes.AddAsFirst(internalMenuItem);
SPNavigationNode externalSubMenuItem1 = new SPNavigationNode("Site Settings",
quickLaunchWeb.Url + "/_layouts/settings.aspx", true);
quickLaunchNodes[0].Children.AddAsFirst(externalSubMenuItem1);
SPNavigationNode externalSubMenuItem2 = new SPNavigationNode("Create",
quickLaunchWeb.Url + "/_layouts/create.aspx", true);
quickLaunchNodes[0].Children.AddAsFirst(externalSubMenuItem2);
quickLaunchWeb.Update();
Here is what the quicklaunch Site Collection looks like after the above code has
been executed:
href="https://blogger.googleusercontent.com/img/b/R29vZ2xl/AVvXsEgh3aWGZatNNPic81FuwQVmNATKvSvkVtj6RMQ94JG2Whd1KpfbTYPGK9Fafv_qg2R4QWFmlYO2MGT6GkMs-aCwqZQt3yZEBkO_RF_7wuTIjrfSKCfYCwFg-hZl83DV7drFe0V19OuA3BCx/s1600-h/sitenav7.jpg">

Top Navigation Menu Items
SPSite topNavigationSite = new SPSite(“http://server/topnavigation”);
SPWeb topNavigationWeb = topNavigationSite.OpenWeb();
SPNavigationNodeCollection topNavigationNodes =
topNavigationWeb.Navigation.TopNavigationBar;
SPNavigationNode internalMenuItem = new SPNavigationNode(“Links”, “Lists/Links
/AllItems.aspx”, false);
topNavigationNodes.AddAsFirst(internalMenuItem);
SPNavigationNode externalMenuItem = new SPNavigationNode(“SharePoint Experts”,
“http://www.SharePointExperts.com”, true);
topNavigationNodes.AddAsFirst(externalMenuItem);
topNavigationWeb.Update();
Here is what the topnavigation top level site looks like after the above code has
been executed:

Here is how you delete a menu item from the top navigation menu. In this example we
will remove the Links link we just added to the top navigation menu for the
topnavigation top level site.
SPSite topNavigationSite = new SPSite(“http://server/topnavigation”);
SPWeb topNavigationWeb = topNavigationSite.OpenWeb();
SPNavigationNodeCollection topNavigationNodes =
topNavigationWeb.Navigation.TopNavigationBar;
topNavigationNodes.Delete(topNavigationNodes[0]);
topNavigationWeb.Update();
Here is what the topnavigation top level site looks like after the above code has
been executed:

Taking the Top Navigation one step further
The top Navigation menu is capable of displaying dropdown menus that consist of
multiple items. Adding additional sub menu items under the topmost item is a
simple process and requires very little code.
Here is how you add a sub menu item to a top level menu item in the top navigation
menu. In this example we will add a new top level menu item to the top
navigation menu that has two sub menu items under it for the topnavigation top
level site.
SPSite topNavigationSite = new SPSite(“http://server/topnavigation”);
SPWeb topNavigationWeb = topNavigationSite.OpenWeb();
SPNavigationNodeCollection topNavigationBarNodes =
topNavigationWeb.Navigation.TopNavigationBar;
SPNavigationNode headerMenuItem = new SPNavigationNode("SharePoint Sites", "",
false); topNavigationBarNodes.AddAsFirst(headerMenuItem);
SPNavigationNode externalSubMenuItem1 = new SPNavigationNode("SharePoint Experts",
"http://www.SharePointExperts.com", true);
topNavigationBarNodes[0].Children.AddAsFirst(externalSubMenuItem1);
SPNavigationNode externalSubMenuItem2 = new SPNavigationNode("SharePoint
University", "http://www.SharePointU.com", true);
topNavigationBarNodes[0].Children.AddAsFirst(externalSubMenuItem2);
topNavigationWeb.Update();
Here is the code used to add the links:
SPSite topNavigationSite = new SPSite(“http://server/topnavigation”);
SPWeb topNavigationWeb = topNavigationLaunchSite.OpenWeb();
SPNavigationNodeCollection topNavigationBarNodes =
topNavigationWeb.Navigation.TopNavigationBar;
SPNavigationNode headerMenuItem = new SPNavigationNode("Administration", "", false);
topNavigationBarNodes.AddAsFirst(headerMenuItem);
SPNavigationNode externalSubMenuItem1 = new SPNavigationNode("Site Settings",
topNavigationWeb.Url + "/_layouts/settings.aspx", true);
topNavigationBarNodes[0].Children.AddAsFirst(externalSubMenuItem1);
SPNavigationNode externalSubMenuItem2 = new SPNavigationNode("Create",
topNavigationWeb.Url + "/_layouts/create.aspx", true);
topNavigationBarNodes[0].Children.AddAsFirst(externalSubMenuItem2);
topNavigationWeb.Update();
Link to Original Article
Tuesday, October 7, 2008
SharePoint Tip - Shortcut to 12 hive with ease
I have to go to 12 Hives from command prompt so often that i looked for a better
solution to reach there . Here is what you have to do:
(1) Create a new text file in notepad and write the path to 12 hives like this :
cd C:\Program Files\Common Files\Microsoft Shared\web server extensions\12
(2) Save the file as 12.cmd
(3) Copy the file and put it inside c:\Windows folder
(4) Job done... from anywhere in command prompt as soon as you press 12 , you get to
12 hives of sharepoint..
;)
Friday, October 3, 2008
Creating a Scope and Tab for MOSS Search Center -By : Scot Hillier
I found a good article from Scot About Creating a Scope and Tab for MOSS Search
Center. Here is a direct link to the Article : Click Here
New tabs for Search Center involve several different parts. First, you must create a
search page. Then you must create a search results page. Finally, you must
associate the scope with the new pages and create tabs to display them. Follow
these steps to get it all working:
1. From the Search Center page, select Site Actions>>Create Page
2. On the Create Page
- Enter HR Documents Search in the Title field
- SharePoint should automatically generate a valid page name
- Select "Search Page" from the list of available Page Layouts
- Click the Create button
3. A new page should now be visible with a Search Box web part
- Select Modify Shared Web Part from the web part's edit menu
- Expand the Miscellaneous section
- Enter HRDocumentsResults.aspx in the Target Search Results Page URL field
(you will create this page next)
- Uncheck the box labeled "Display Advanced Search Link"
- Click the OK button
- Click the Publish button at the top of the page
4. From the new page, select Site Actions>>Create Page
5. On the Create Page
- Enter HR Documents Search Results in the Title field
- SharePoint should automatically generate a valid page name
- Select "Search Results Page" from the list of available Page Layouts
- Click the Create button
6. A new page should now be visible with a several search web parts
- Select Modify Shared Web Part from the Search web part's edit menu
- Expand the Miscellaneous section
- Enter HRDocumentsResults.aspx in the Target Search Results Page URL field
- Uncheck the box labeled "Display Advanced Search Link"
- Click the OK button
- Select Modify Shared Web Part from the Search Core Results web part
- Expand the Miscellaneous section
- Enter HR Documents in the Scope field
- Click the OK button
- Click the Publish button at the top of the page
7. From the new page, select Site Actions>>View All Site Content
8. On the All Site Content page, click the "Tabs in Search Pages" link
9. On the Tabs in Search Pages list, click the New button
10. On the New Item page
- Enter HR Documents in the Tab Name field
- Enter HRDocumentsSearch.aspx in the Page field
- Click the OK button
11. From the list, select Site Actions>>View All Site Content
12. On the All Site Content page, click the "Tabs in Search Results" link
13. On the Tabs in Search Results list, click the New button
14. On the New Item page
- Enter HR Documents in the Tab Name field
- Enter HRDocumentsSearchResults.aspx in the Page field
- Click the OK button
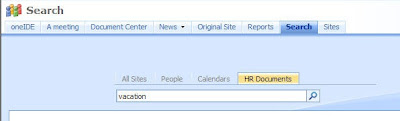
Return to the Search Center home page and you should now see a new tab visible for
HR Documents.
Center. Here is a direct link to the Article : Click Here
Create the new Search Center Tab
New tabs for Search Center involve several different parts. First, you must create a
search page. Then you must create a search results page. Finally, you must
associate the scope with the new pages and create tabs to display them. Follow
these steps to get it all working:
1. From the Search Center page, select Site Actions>>Create Page
2. On the Create Page
- Enter HR Documents Search in the Title field
- SharePoint should automatically generate a valid page name
- Select "Search Page" from the list of available Page Layouts
- Click the Create button
3. A new page should now be visible with a Search Box web part
- Select Modify Shared Web Part from the web part's edit menu
- Expand the Miscellaneous section
- Enter HRDocumentsResults.aspx in the Target Search Results Page URL field
(you will create this page next)
- Uncheck the box labeled "Display Advanced Search Link"
- Click the OK button
- Click the Publish button at the top of the page
4. From the new page, select Site Actions>>Create Page
5. On the Create Page
- Enter HR Documents Search Results in the Title field
- SharePoint should automatically generate a valid page name
- Select "Search Results Page" from the list of available Page Layouts
- Click the Create button
6. A new page should now be visible with a several search web parts
- Select Modify Shared Web Part from the Search web part's edit menu
- Expand the Miscellaneous section
- Enter HRDocumentsResults.aspx in the Target Search Results Page URL field
- Uncheck the box labeled "Display Advanced Search Link"
- Click the OK button
- Select Modify Shared Web Part from the Search Core Results web part
- Expand the Miscellaneous section
- Enter HR Documents in the Scope field
- Click the OK button
- Click the Publish button at the top of the page
7. From the new page, select Site Actions>>View All Site Content
8. On the All Site Content page, click the "Tabs in Search Pages" link
9. On the Tabs in Search Pages list, click the New button
10. On the New Item page
- Enter HR Documents in the Tab Name field
- Enter HRDocumentsSearch.aspx in the Page field
- Click the OK button
11. From the list, select Site Actions>>View All Site Content
12. On the All Site Content page, click the "Tabs in Search Results" link
13. On the Tabs in Search Results list, click the New button
14. On the New Item page
- Enter HR Documents in the Tab Name field
- Enter HRDocumentsSearchResults.aspx in the Page field
- Click the OK button
Return to the Search Center home page and you should now see a new tab visible for
HR Documents.

Migrating Site / SubSite / Content and Content Deployment Tool from Chris O' Brien
If you came across situation like these :
* I just need to move this document library from A to B
* I just need to move these selected files (e.g. master page, page layouts, CSS
etc.) from A to B
* I just need to move this web from A to B
* I just need to move this site collection from A to B
* I just need to move these 20 list items from A to B
Then Chris O'Brien is here for rescue.
I know there are other 2 methods to accomplish the same task :
(1) Using Sharepoint designer tool to Backup and restore the site
(2) Stsadm.exe command line tool
The only thing i dint like about these two methods is the limitation of what you can migrate.
Sharepoint designer allows site migration of size with 25 MB or below. Also Both methods
want you to create an empty site before export of data.
Then I found a very handy tool for migrating my stuff from one site collection to another. This
tool designed by Chris O' Brien is so Cool, The migration of Stuff becomes so so easy. It is
a must see tool for all SharePoint Developer. The new and better 1.1 version is released
in CodePlex , This time he has Provided the Code of the Content Deployment Wizard as
well.
You Can Learn about the Product Here
You can learn on product operation Here
You can directly download the latest Version of Product as well as the source code Here
Job done with little pain ;)
* I just need to move this document library from A to B
* I just need to move these selected files (e.g. master page, page layouts, CSS
etc.) from A to B
* I just need to move this web from A to B
* I just need to move this site collection from A to B
* I just need to move these 20 list items from A to B
(1) Using Sharepoint designer tool to Backup and restore the site
(2) Stsadm.exe command line tool
Sharepoint designer allows site migration of size with 25 MB or below. Also Both methods
want you to create an empty site before export of data.
tool designed by Chris O' Brien is so Cool, The migration of Stuff becomes so so easy. It is
a must see tool for all SharePoint Developer. The new and better 1.1 version is released
in CodePlex , This time he has Provided the Code of the Content Deployment Wizard as
well.
You can learn on product operation Here
You can directly download the latest Version of Product as well as the source code Here
Thursday, October 2, 2008
Attach Custom Button on Editform.aspx and Newform
Including the "Custom " Button to the Page
Open the SharePoint Site containing the List to modify using SharePoint Designer
2007 and use the Folder List to navigate to the target List under the folder Lists
(In this example, I will be using the Links list that comes along with any site
created using the Team Site site template). Double click on the NewForm.aspx page.
The NewForm.aspx page would open in code view. Identify the Content control with the
ContentPlaceHolderId of PlaceHolderMain. We will be actively inserting extra
JavaScript and HTML within this Content control that will alter the behavior of the
page. First of all, let's insert the appearance of the 2 HTML elements that we will
be inserting into the rendered page. The <table> element here is made hidden
as it serves no purpose but as a "host" to the 2 <td> elements that
are marked with their respective IDs which we will be using later. Note that the
first <td> element contains the "OK and New" button that will
perform certain custom JavaScript function when clicked upon. We will be diving into
the JavaScript function's details later. Insert the HTML code right above the
closing tag of the Content control </asp:Content>.
<table style="display:none">
<tr>
<td id="oCustomButton" class="ms-toolbar" nowrap="true">
<table cellpadding="0" cellspacing="0" width="100%">
<tr>
<td align="right" width="100%" nowrap>
<input type="button" value="Custom Button"
onclick="submitForm()" class="ms-ButtonHeightWidth" target="_self" />
</td>
</tr>
</table>
</td>
<td id="oSeparator" class="ms-separator"> </td>
</tr>
</table>
Next task is inserting the relevant elements into the right position on the page,
such that it appears next to the OK button, along the Cancel button as well.
Insert the following JavaScript code into a script element into the page right below
the above pasted HTML codes:
<script language="javascript" type="text/javascript">
function attachCustomButton()
{ var oAryTables = new Array();
var oCustomButton = null;
var oSeparator = null;
var oNodeTemp = null;
oCustomButton = document.getElementById("oCustomButton");
oSeparator = document.getElementById("oSeparator");
oAryTables = document.getElementsByTagName("table");
for(var i = 0; i < oAryTables.length; i++)
{ if(oAryTables[i].className == "ms-formtoolbar")
{ oNodeTemp =
oAryTables[i].firstChild.firstChild.insertBefore(oSeparator.cloneNode(true),
oAryTables[i].firstChild.firstChild.firstChild.nextSibling);
oAryTables[i].firstChild.firstChild.insertBefore(oCustomButton.cloneNode(true),
oNodeTemp);
}
}
} _spBodyOnLoadFunctionNames.push("attachCustomButton");
</script>
Now write your own code for the ButtonClick Event.
;)
Add New Event to Buttons of default Newform.aspx, Dispform.aspx and Editform.aspx
There comes a situation when you want the default Ok or Edit item or close buttons in SharePoint forms pages like Newform.aspx, Dispform.aspx and Editform.aspx to redirect user to new page then specified. To do that we can use java script code to redirect users to different page then the normal ones. I am using an instant of giving an alert to user when user clicks on Ok button of editform.aspx . I am using content editor webpart to add javascript code to editform.aspx page. You can look into by earlier post if you are not aware of method to put content editor webpart in editform.aspx page. Here is the post click here After the Webpart is added, make sure the Inside Layout Tab, the Hidden checkmark is checked, to hide the webpart during normal use. In the content editor webpart , put this javascript code: Replace [] with < >[script language="javascript" type="text/javascript"] _spBodyOnLoadFunctionNames.push("StartUpCustomScript"); function StartUpCustomScript() { ChangeOkButtonOnclickEvent("Input","SaveItem"); } function ChangeOkButtonOnclickEvent(tagName, identifier) { var len = identifier.length; var tags = document.getElementsByTagName(tagName); /*find all Input type controls on page (ie. control with tag [Input/])*/ for (var i=0; i < tags.length; i++) { var tempString = tags[i].name; if(tempString.indexOf(identifier) == tempString.length-len ) /*find any Input type controls on page has its name ending with 'SaveItem'*/ { /*if found, replace it default onclick with our custom script*/ var func = tags[i].attributes["onclick"].value.replace("if (!PreSaveItem())","alert('you have clicked OK');if (!PreSaveItem())"); /*remove its default onclick event*/ tags[i].onclick = null; /*re-register its onlick event with new script*/ tags[i].attachEvent("onclick",new Function(func)); } } return null; } [/script]Adding this now as soon as from editform.aspx when you click Ok button , a alert message will pop up.Job done :)

Subscribe to:
Posts (Atom)
-
In Microsoft Dynamic CRM 2016/365 are you as confused as me when looking at the solution.xml from the solution export? looking at the xml a...
-
Crystal report works great when the export feature is used to export reports to PDF and word, but the one real drawback is the ‘Export to ...
-
 Conversion Functions: Conversion Function Description CBool(number), CBool(currency) Convert to Boolean. CCur(number...