Including the "Custom " Button to the Page
Open the SharePoint Site containing the List to modify using SharePoint Designer
2007 and use the Folder List to navigate to the target List under the folder Lists
(In this example, I will be using the Links list that comes along with any site
created using the Team Site site template). Double click on the NewForm.aspx page.
The NewForm.aspx page would open in code view. Identify the Content control with the
ContentPlaceHolderId of PlaceHolderMain. We will be actively inserting extra
JavaScript and HTML within this Content control that will alter the behavior of the
page. First of all, let's insert the appearance of the 2 HTML elements that we will
be inserting into the rendered page. The <table> element here is made hidden
as it serves no purpose but as a "host" to the 2 <td> elements that
are marked with their respective IDs which we will be using later. Note that the
first <td> element contains the "OK and New" button that will
perform certain custom JavaScript function when clicked upon. We will be diving into
the JavaScript function's details later. Insert the HTML code right above the
closing tag of the Content control </asp:Content>.
<table style="display:none">
<tr>
<td id="oCustomButton" class="ms-toolbar" nowrap="true">
<table cellpadding="0" cellspacing="0" width="100%">
<tr>
<td align="right" width="100%" nowrap>
<input type="button" value="Custom Button"
onclick="submitForm()" class="ms-ButtonHeightWidth" target="_self" />
</td>
</tr>
</table>
</td>
<td id="oSeparator" class="ms-separator"> </td>
</tr>
</table>
Next task is inserting the relevant elements into the right position on the page,
such that it appears next to the OK button, along the Cancel button as well.
Insert the following JavaScript code into a script element into the page right below
the above pasted HTML codes:
<script language="javascript" type="text/javascript">
function attachCustomButton()
{
var oAryTables = new Array();
var oCustomButton = null;
var oSeparator = null;
var oNodeTemp = null;
oCustomButton = document.getElementById("oCustomButton");
oSeparator = document.getElementById("oSeparator");
oAryTables = document.getElementsByTagName("table");
for(var i = 0; i < oAryTables.length; i++)
{
if(oAryTables[i].className == "ms-formtoolbar")
{
oNodeTemp =
oAryTables[i].firstChild.firstChild.insertBefore(oSeparator.cloneNode(true),
oAryTables[i].firstChild.firstChild.firstChild.nextSibling);
oAryTables[i].firstChild.firstChild.insertBefore(oCustomButton.cloneNode(true),
oNodeTemp);
}
}
}
_spBodyOnLoadFunctionNames.push("attachCustomButton");
</script>
Now write your own code for the ButtonClick Event.
;)
Thursday, October 2, 2008
Add New Event to Buttons of default Newform.aspx, Dispform.aspx and Editform.aspx
There comes a situation when you want the default Ok or Edit item or close buttons in SharePoint forms pages like Newform.aspx, Dispform.aspx and Editform.aspx to redirect user to new page then specified. To do that we can use java script code to redirect users to different page then the normal ones. I am using an instant of giving an alert to user when user clicks on Ok button of editform.aspx . I am using content editor webpart to add javascript code to editform.aspx page. You can look into by earlier post if you are not aware of method to put content editor webpart in editform.aspx page. Here is the post click here After the Webpart is added, make sure the Inside Layout Tab, the Hidden checkmark is checked, to hide the webpart during normal use. In the content editor webpart , put this javascript code: Replace [] with < >[script language="javascript" type="text/javascript"] _spBodyOnLoadFunctionNames.push("StartUpCustomScript"); function StartUpCustomScript() { ChangeOkButtonOnclickEvent("Input","SaveItem"); } function ChangeOkButtonOnclickEvent(tagName, identifier) { var len = identifier.length; var tags = document.getElementsByTagName(tagName); /*find all Input type controls on page (ie. control with tag [Input/])*/ for (var i=0; i < tags.length; i++) { var tempString = tags[i].name; if(tempString.indexOf(identifier) == tempString.length-len ) /*find any Input type controls on page has its name ending with 'SaveItem'*/ { /*if found, replace it default onclick with our custom script*/ var func = tags[i].attributes["onclick"].value.replace("if (!PreSaveItem())","alert('you have clicked OK');if (!PreSaveItem())"); /*remove its default onclick event*/ tags[i].onclick = null; /*re-register its onlick event with new script*/ tags[i].attachEvent("onclick",new Function(func)); } } return null; } [/script]Adding this now as soon as from editform.aspx when you click Ok button , a alert message will pop up.Job done :)

Wednesday, October 1, 2008
Writing Custom Web Services for sharepoint 2007
There is a good Article on Building Sharepoint web services on MSDN :
You can View the Article here : http://msdn.microsoft.com/en-us/library/ms916810.aspx But the articles is for sharepoint 2003.
There is one more good Article in "toolbox for IT" which i found and seems to be a derived into much simpler form from MSDN Article.
You can view the article here : http://it.toolbox.com/blogs/sharepoint-blog/creating-a-custom-web-service-for-sharepoint-13553
But The above articles are for sharepoint 2003 . Its almost the same for 2007 but you have to make some changes to accomodate it in 2007 .
Here are 2 things you have to take care:
1. location to drop dll file: there is no \ISAPI\BIN in MOSS2007 (at least for now) put the dll in ASP.NET vitrual directory e.g. C:\Inetpub\wwroot\wss\VirtualDirectories\(sharepoint port:80)\_app_bin\mydllname.dll
2.Also make sure inside your .asmx file you have named your dll e.g.
[%@ WebService Language="c#" Class="mypackage.myclass,mydllname" %]
( Replace [ ] code on top with < > code)
Rest is all the same , and should work fine for you .
Tuesday, September 23, 2008
Bulk Editing of SharePoint List Items
Imagine you have a list with a “Confirm” yes/No field and you want a user to be able to view items and click a Check box on those items which are completed and click a Save button:

This saves the user opening each item in turn, changing the “Confirm” field and saving the item. This can be done using the SharePoint Designer and using a DataView. To do this:
- Select File + New + Page to create a new ASPX page.
- Choose “Create from Master Page…” and click OK and OK again to use the default master page..
- Save the page as “BulkEdit.aspx” in the list’s folder, e.g. “ConfirmList” where the existing AllItems.aspx file exists.
- “Create Custom Content” for “PlaceHolderMain” using the quick link:

- Open the Data View >Manage Data Source . Click on “Data Source Library” pane on right of screen and click the list, e.g. “ConfirmList” and select Show Data:

- Select the Insert Selected Fields as… button in the Data Source Details panel and select Multiple Item Form:

- From the “Data View” menu select Edit Columns and remove all columns bar “Title” and “Confirm” (or whatever columns you want displayed).
You will now set the “Title” column to be read-only so that only the “Confirm” check box is editable.
- Single click a “Title” edit box and click the “Common FormField Tasks” button (the greater than sign)or top right corner and select “Text” from the “Format as” list.
- Save the file.
- To test, navigate to the page, e.g. TestSite/Lists/ConfirmList/bulkedit.aspx.
Also take a look at http://office.microsoft.com/en-us/sharepointdesigner/HA101191141033.aspx, this uses an XML file as the data source rather than a SharePoint list.
A solution to "An unexpected error has occurred" in WSS v3
Debugging SharePoint can be problematic at times, it does like to hide debugging information from you. The bain of my life recently has been “An unexpected error has occurred” with nothing written to log files, trace or the event log.
Normally I can debug the problem with a little commenting & narrowing down of the problem, but today I have managed to get rid of that error screen completely.
The solution is to change a single entry in web.config, by modifying the line… ( change [ ] Braces to < Braces)
[SafeMode MaxControls=“200“ CallStack=“false“…
to…
[SafeMode MaxControls=“200“ CallStack=“true“…
You will also need to set custom errors to 'Off' .
[customErrors mode=“Off“/]
You will no longer see the “An unexpected error has occurred” error page and instead you get a lovely ’standard ASP.Net error page’ with the stack trace and everything…development has got that little bit easier!!
Wednesday, September 17, 2008
WebPart Connections getting information from Property page - By Paul Culmsee
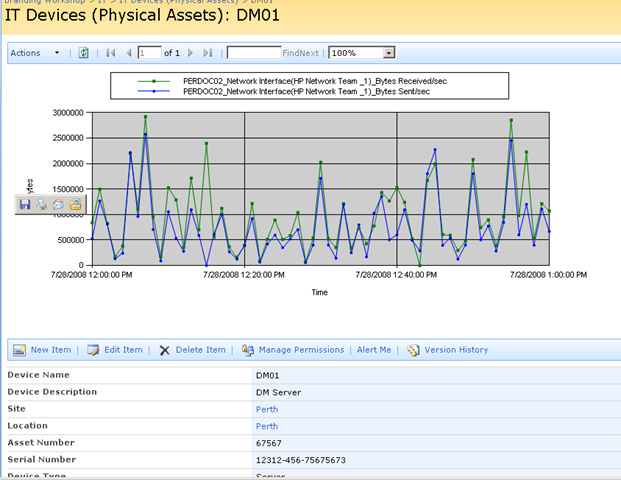
Wouldn’t it be great if we could somehow pass the device name (or some other device information) to the report web part automatically.
That way, each time you opened up a device entry, the report would retrieve performance information for the device currently being viewed. That would be very, very cool.
Fortunately for us it can be easily done. The report services web part, like many other web parts is connectable. This means that it can accept information from other web parts. This means that it is possible to have the parameters automatically passed to the report!
Wohoo!
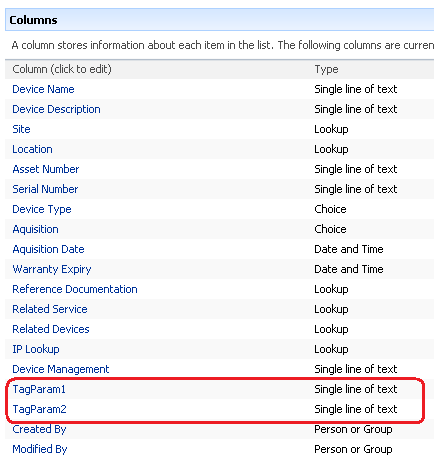
So here is how I am going to do this. I am going to add two new columns to my device list. Each column will be the parameter passed to the report. This way, I can tailor the report being generated on a device by device basis. For example, for a SAN device I might want to report on disk I/O, but a server I might want CPU. If I store the parameter as a column, the report will be able to retrieve whatever performance data I need.
Below shows the device list with the additional two columns added. the columns are called TAGPARAM1 and TAGPARAM2. The next screen below, shows the values I have entered for each column against the device DM01. These values will be passed to the report server report and used to find matching performance data.

So the next question becomes, how do I now transparently pass these two parameters to the report? We now have the report and the parameters on the same page, but no obvious means to pass the value of TagParam1 and TagParam2 to the report viewer web part.
The answer my friends, is to use a filter web part!
Using the toolpane view hack, we once again edit the view item page for the Device List. We now need to add two additional web parts (because we have two parameters). Below is the web part to add.
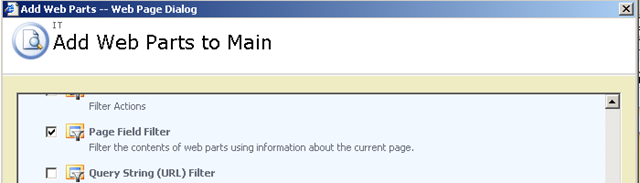
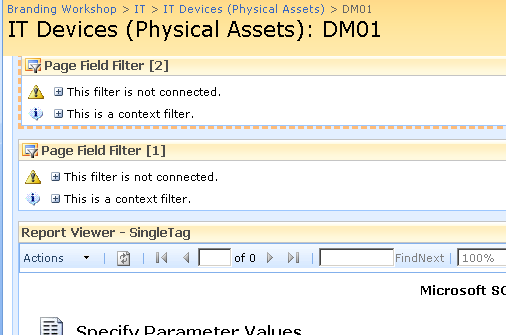
The result should be a screen looking like the figure below

Filter web parts are not visible when a page is rendered in the browser. They are instead used to pass data between other web parts. There are various filter web parts that work in different ways. The Page Field filter is capable of passing the value of any column to another web part.
Confused? Check out how I use this web part below…
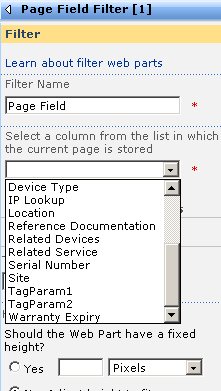
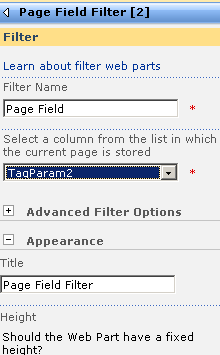
The screen above shows that the two Page Field filters web parts are not configured. They are prompting you to open the tool pane and configure them. Below is the configuration pane for the page field filter. Can you see how it has enumerated all of the columns for the "IT device" list? In the second and third screen we have chosen TagParam1 for the first page filter and TagParam2 for the second page filter web part.

Now take a look at the page in edit mode. The page filters now change display to say that they are not connected. All we have done so far is tell the web parts which columns to grab the parameter values from
Almost Home - Connecting the filters
So now we need to connect each Page Field filter web part to the report viewer web part. This will have the effect of passing to the report viewer web part, the value of TagParam1 and TagParam2. Since these values change from device to device, the report will display unique data for each device.
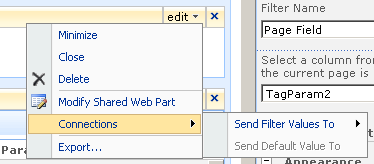
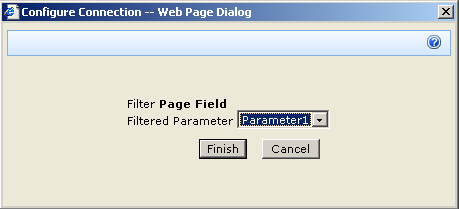
To to connect each page filter web part you click the edit dropdown for each page filter. From the list of choices, choose "Connections", and it will expand out to the choice of "Send Filter Values To". If you click on this, you will be promoted to send the filter values to the report viewer web part on the page. Since in my example, the report viewer web part requires two parameters, you will be asked to choose which of the two parameters to send the value to.
Repeat this step for both page filter web parts and something amazing happens, we see a performance report on the devices page!! The filter has passed the values of TagParam1 and tagParam2 to the report and it has retrieved the matching data!
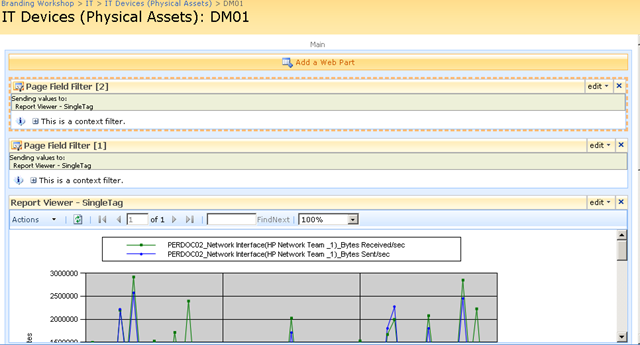
Let’s now save this page and view it in all of its glory! Sweet eh!
Credit : Paul Culmsee
Link to Original Post : http://www.cleverworkarounds.
Remove "New" icon from newly added Document using JavaScript
Adding JavaScript to a page inside a Content Editor web part can be a great way to perform on-the-fly customizations to your SharePoint sites. This worked great in WSS v2 and SPS 2003. We started noticing that some of those scripts didn’t seem to work in WSS v3 and MOSS 2007, however, and it wasn’t because the names of objects and elements had changed.
For example, here is a JavaScript snippet that we had used to hide the “NEW!” icon on a page in WSS v2.
Note: In all code examples below, replace the square brackets around the SCRIPT tags with angle brackets. If I included the angle brackets, the browser tried to execute the code. :o(
[script language="JavaScript"]
var fields,i;
fields = document.getElementsByTagName('IMG');
for( i = 0; i < fields.length; i ++ ) {
 var imgsrc = fields[i].getAttribute('SRC');
 if(imgsrc.indexOf("new.gif") != -1) {
  fields[i].style.visibility = "hidden";
 }
}
[/script]
When we added this to a Content Editor web part in a WSS v3 page, nothing seemed to happen. I added code to make it run on the onLoad event, and that didn’t work either. I did a little experimentation and discovered that if I added a short delay, even a delay of 1/1000 of a second, it worked fine. I placed the core code within a function and then called it with the setTimeout() method.
[script language="JavaScript"]
setTimeout(HideNewIcons,1);
function HideNewIcons(){
 var fields,i;
 fields = document.getElementsByTagName('IMG');
 for( i = 0; i < fields.length; i ++ ) {
   var imgsrc = fields[i].getAttribute('SRC');
   if(imgsrc.indexOf("new.gif") != -1) {
    fields[i].style.visibility = "hidden";
   }
 }
}
[/script]
The problem occurs because most WSS v3 pages use a master page that contains the “body” element, and the page content code loads after the master page code. I didn’t know it at the time, but recently discovered (thanks to this article on the Microsoft SharePoint Products and Technologies Team Blog) that the SharePoint developers had given us a way to work around that issue—it’s the _spBodyOnLoadFunctionNames array. We can use JavaScript’s “push” method to load items into this array where they will run when the body’s onLoad event fires .
Here is what the JavaScript looks like with the setTimeout replaced with a line that pushes the function name “HideNewIcons” into the _spBodyOnLoadFunctionNames array.
[script language="JavaScript"]
_spBodyOnLoadFunctionNames.push("HideNewIcons");
function HideNewIcons(){
 var fields,i;
 fields = document.getElementsByTagName('IMG');
 for( i = 0; i < fields.length; i ++ ) {
   var imgsrc = fields[i].getAttribute('SRC');
   if(imgsrc.indexOf("new.gif") != -1) {
    fields[i].style.visibility = "hidden";
   }
 }
}
[/script]
If you’ve been having trouble getting some of your legacy JavaScript scripts to run from within Content Editor web parts in WSS v3 or MOSS 2007 pages, give this technique a try, and let me know if it works for you.
Credit : Rickey Spears
Subscribe to:
Posts (Atom)
-
In Microsoft Dynamic CRM 2016/365 are you as confused as me when looking at the solution.xml from the solution export? looking at the xml a...
-
Crystal report works great when the export feature is used to export reports to PDF and word, but the one real drawback is the ‘Export to ...
-
 Conversion Functions: Conversion Function Description CBool(number), CBool(currency) Convert to Boolean. CCur(number...